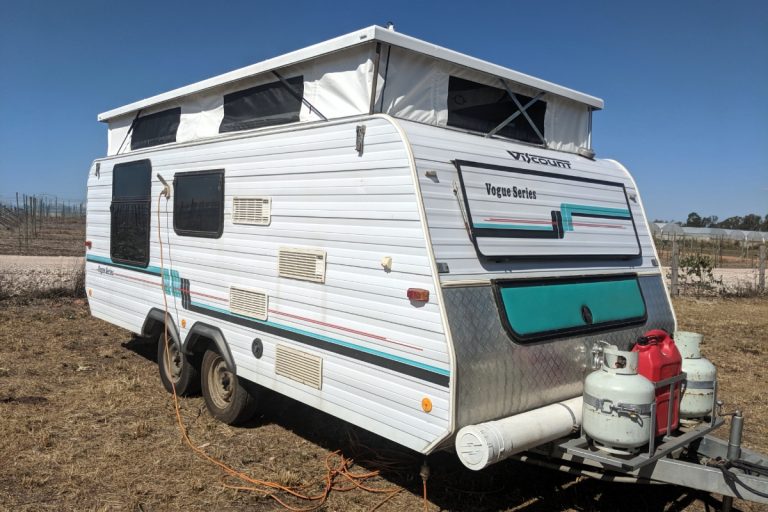
Early in 2019 our 1994 Viscount Vogue Pop Top caravan (we call Josephine) had small signs the pop top roof was leaking and needed to be repaired or replaced. In this post I will walk you through the process of how I did a DIY pop top caravan roof leak repair and the costs.
It is necessary to note that this article is a run down or the story of the process I used to successfully repair our caravan pop top roof leak. This is not an article with technical instructions.
Pop Top Caravan Roof Leak Repair
Pop Top Roof Removal
Luckily we have a friend Pete, who builds trailers and alike (yell out if you need anything) with a three bay shed large enough to facilitate the job of repairing a pop top caravan roof. Pete, as luck would have it also had most of the tools and equipment that needed to do the job. If you plan to do a pop top roof repair or replacement yourself it is necessary to have adequate undercover space and the tools necessary to do the job.
Whilst the decision to remove the roof had been made I hadn’t really come up with a plan on how to remove it, so we (Pete and I) made it up as we went.
First we released the bottom edge of the pop top skirt which was a piece of cake. The electrics were also disconnected including from the solar panel.
The roof was then still attached to the caravan by the scissor lifts and struts. Having only one block n tackle we used it to hang the roof from the rafters at the front end of the caravan and manually handled the rear end. In order to do that we ran a four metre long box section of steel through the rear end of the caravan and clamped it at the roofs full height to a shed upright on either side.
With the rear of the roof resting on the steel and the front supported with the block n tackle we removed the gas struts by undoing the clip on each ball end (bottom) and then removed the scissor lifts from each end. If I was doing this job again I’d probably only release the scissor lifts from the roof itself. It was then time to tow Josephine out from under the roof which we did. A pop top caravan without a roof is quite the sight.
Having pulled Josephine out of the way, next we needed to get the roof down from the rafters in order to work on it. I should point out that whilst our method may not have met all WHS standards, the job was completed both damage and injury free.
The weight of the roof panel was pretty bloody heavy and this meant lowering it by hand was out of the question so we came up with an en genius plan to lower it. We found another shorter length of steel tube and positioned it in the centre of steel holding up the roof in the shape of a T. The bottom of the steel tub was then placed (now this is the dodgy bit) on a fully extended floor jack. Having backed off the clamps on either side just enough to allow the roof to move we lowered the roof down inch by inch using the jack, then tighten the clamps up again. The front end was lowered at the same speed using the the block and tackle.
The roof was still nearly 2 metres off the ground so we cut the upright part of our T down and again used the floor jack and block and tackle until the roof was about metre off the ground and lowered the roof on positioned saw horses.
The next step with the roof down was to flip it so the ceiling was exposed facing up. Once flipped the roof was placed again on saw horses.
Removal of Roof Panel from Frame
Next (another day this time working solo due to Pete having to return to work) I set about removing anything and everything fixing the roof panel such as light fittings and the aluminium frame (extrusion). Turns out its a hell of a lot of screws holding the roof panel and extrusion frame together.
It quickly became obvious that the roof would need to be flipped over again so I could get to the said screws to remove them. This time I managed to flip the roof on my own, a bit of a job in itself but I got there in the end only to discover that had been the easy part.
Getting the screws out of the exterior side meant removing a hell of a lot of old sealant. Two or three hours in, having tried scrappers, knives, screw drivers without much progress I changed to using a fine wire brush grinder wheel. An hour later every last bit of sealant had been removed. It did mean everything else was covered in a layer powdered silicon. If you do this yourself, be sure to use PPE such as safety glasses and mask and cover everything the area.
Sealant removed I could see it was the screws as well a strip of plastic T-mould that filled and covered the gap between the panel and the frame, holding the roof panel and frame together. The initial stages of removing the moulding made the sealant removal look easy.
Having once again reverted to trying every tool at hand (even a bit of heat) I tried a small but sharp scribe. The scribe was small enough and had just enough strength to fit in the channel under the moulding and lift it just enough to allow me to start pulling it out, bending it back on itself. This still took well over an hour to remove as the moulding was brittle in places, and stuck in others.
Sealant, moulding and screws removed, the panel was now free from the frame. I was now able to separate the panel from the frame dropping the frame down on to the floor.
Removing Ceiling Sheets
Before flipping the panel again I stripped the exterior paint off taking the roof back to bare metal in preparation for painting. To do this I used another wire brush wheel.
Roof again flipped with the ceiling now on the top I soon found that whomever had built it had not spared any staples. Each staple had to be removed one by one, here again my trusty scribe came in handy to quickly pry each and every one out.
With staples removed it was time to remove the ceiling sheets. This too was not an easy task. The sheets were well and truly glued to the internal polystyrene insulation. Needing to remove them, I set about manually peeling back the ceiling sheets, too my surprise I managed to get the vast majority off with minimal damage to the insulation. A few sections needed more convincing than others and this was when a, multi tool worked a treat.
Sourcing and Buying Supplies
Next I set out to buy everything I needed to do the repairs and rebuild the roof. To my complete surprise (not) it turned out I couldn’t buy everything I needed “off the shelf”. The sheets I wanted for the ceiling were special order and the timber needed for the frame couldn’t be bought in the profiles I needed.
Fortunately another shopper gave me the heads up on a local (Ipswich) timber yard/mill whom may be able to help with the timber. The guys at the mill were great. They didn’t have what I wanted off the shelf but were happy to cut to size and thickness. $20 and 20 minutes later I had the few bits of timber required to repair the frame.
Sourcing the right type of primer and paint wasn’t as easy as I had hoped, ringing and driving around western Brisbane. Eventually I managed to source the primer and paint I needed. I chose to use ASTEC Energy Star EC-100 due to it being a heat reflecting water proof membrane. This cost $60 for 2 litres and primer enough for 3 generous coats.
Ceiling sheet were ordered through a local hardware store. When the 4 shiny new RV specific ceiling sheets arrived over a week later and $200 it was time to put everything back together. Or so I thought.
I soon realised I hadn’t sourced a replacement for the plastic T mould from the roof, armed with a piece of it for reference I made the short trip to a local caravan repairer hoping to buy some. I quickly learned that it wasn’t available or used any more. Instead I was shown that a similarly sized aluminum T section and an appropriate amount of sealant is the current method. $50 later I had the aluminum T section.
I was hopeful that now I had everything and was ready to put the roof back together.
Also just to note the new pop top skirt had already been purchased and delivered for $530 from Bagsnswags prior to the roof even coming off Josephine. The skirt was ready and waiting to be put on when I was ready. We decided to change from a grey skirt to a white one for a more brighter crisp look. In addition we had the number of ‘windows’ the skirt increased from 4 to 6 to allow more light and ventilation.
Repairing the Roof Damage
By the end of the day the ceiling sheets were completely removed and the full extent of the damage was revealed. Our decision to tarp the van when ever it rained since the leak first appeared meant that there had been only minimal damage to the timber frame of the panel. I used the multi tool to remove the damaged section and later after purchasing the timber at the right profile easily made the repair.
Replacing the Ceiling Sheets
The actual ceiling was pretty straight forward. The sheets were cut to size and I then marked and cut out where internal fittings such as lights and handles (raising lowering roof) would go.
Next I applied appropriate contact adhesive before positioning sheets in place and stapled around outer edges and where the light fittings would hide the staples. Needing to weigh down the ceiling sheets while the contact adhesive dried, I found and used four 20L bottles of oil and numerous other bits n pieces for the job. It was left overnight.
The joins between the individuals sheets were covered over by a thin strip of wood painted glued and stapled into position and then painted white to match the ceiling colour.
Reattaching the Extruded Frame and Resealing the Joints
Now came time to reattached the extruded frame to the panel. To do this the roof panel was flipped yet again and then I lifted the frame back up off the the floor to meet the panel and everything fitted as it should.
With my new found knowledge from the caravan repairer I added the aluminium T section and appropriate amount of sealant, Sikaflex pro. I may have used slightly more than I needed but decided to better safe than sorry. I used the sealant to completely resealed the outer edges and centre strip I left the roof for 48 hours prior to painting.
Repainting and Waterproofing the Roof
First step was to prime the roof I used a Zinseer primer. Next I set about applying the waterproof heat reflective membrane ASTEC EC-100. I ended up using a brush to apply it to the sealed sections in order to ensure coverage and a roller to apply it to the flat sections of roof. I found 2L was enough for 3 coats.
With our newly painted roof and shiny new ceiling and my helping hands back, it was time to put the roof back on the old girl. This was achieved by doing a reversal of our dodgy removal process. We used the block and tackle at the front of the roof and steel beam and jack at rear to lift to roof until it was high enough to position Josephine underneath.
We then reattached the scissor lifts and gas struts before re-installing the lights and reconnecting the electrics.
New Pop Top Skirt (Canvas) and New Flooring
It was time to complete the process. This was achieved by installing the new pop top skirt we had purchased online as the old one while still functional looked dated and old. We thought it would be a simple process and after much frustration I contacted the supplier.
The supplier informed me of some small (until now unseen) ink marks near the corners which needed to be positioned in the corners of the roof frame to line everything up and with this knowledge the new skirt was attached within an hour.
Somewhere in the process of repairing the roof “we” decided also to rip up the old carpet in the caravan and put new flooring vinyl planks which cost $90 but that’s another story.
FINALLY my/our roof restoration job was finished. Finally Josephine had her roof back. The whole process took me four or five days spread out over a few weeks due to delays in supplies and numerous games of golf.
Total spend came in at approx $1000 inclusive.
- $530 for the skirt
- $200 for ceiling sheets
- $100 Sikaflex Pro
- $60 for paint and primer
- $50 Aluminium T section and sealant
- $20 for timber cut to the correct profile
- $40 for a few other bits like staples for staple gun
The Final Word
My advice if you’re planning a similar job, would be to try and determine exactly what you need and to source everything prior to commencing the job. If you have the means and space to remove your roof and work on it, consider giving it a go.
Another alternative we considered was a composite fibreglass panel I priced this from a Brisbane firm StyroMax which for our job came in at $2300 plus delivery. To be honest if I needed to do the job again I think I would take the composite panel route. That being said I’m glad I gave it a crack and almost a year on we’re happy with the completed job.